Showing posts with label Montessori. Show all posts

Monday, 26 February 2024

Print

Montessori Activity: Creating 3-Dimensional Pyramid with Colored Bead Stair

Objective:

To provide your child a sensorial experience of building squares and stacking them up into a pyramid with the colored bead stairs.

Materials:

10 each of the color bead stairs from Decanomial Bead Bars set

Additional Information:

C invented this activity by herself today while working on making combinations of 10 with colored bead stairs.


Wednesday, 12 January 2022

Print

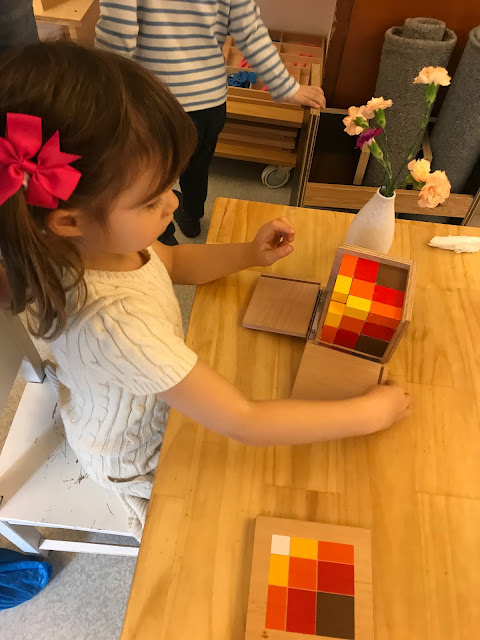
Montessori Activity: Arithmetic Trinomial Cube


AGE: From 3 to 3.5 years old


OBJECTIVE(S): 

1. Visually introduce the child to the concept of cubes of trinomial, while providing a fun challenge. 
2. To prepare the child for mathematics, especially algebra, through the cube’s visual representation of the following algebraic formulas:  (a+b+c)3 =  (a+b+c) * (a+b+c) * (a+b+c)  = a3+3a2b+3a2c+b3+3ab2+3b2c+c3+3ac2+3bc2+6abc

MATERIALS:

1 Arithmetic Trinomial Cube: This cube represents the equation (a+b+c)3 in concrete form and differs from the Trinomial Cube in that the component pieces are color-coded to represent hierarchical values from 1 unit to 1 million. This makes it possible for the child to equate an arithmetical value to each of the cubes and prisms.

PRESENTATION:

1. Remove the lid and place it on the table with the picture facing up.

2. Take out all the prisms out carefully one layer at a time, keeping each level together.

3. Bring your child’s attention to the red cube.

4. Place it into the back left corner of the box.

5. Bring attention to one of the red sides of the cube and place a prism that also has a red side in front of the red cube.

6. Build the first layer by working your way from the back left corner to the front and then from the right side to the front.

7. Build the second and third layer in the same manner. 

8. Close the box, one side at a time and then replace the lid.

9. Invite the child to work with the trinomial cube.

VARIATIONS:

1. Build the trinomial cube layer-by-layeras in the presentation without the help of the box.

2. Build the trinomial cube outside of the box.

3. Line the blocks in rows by color: a row of reds, a row of blues, a row of yellow and a row of blacks. Then build it layer-by latyer.

VIDEO DEMONSTRATION:

https://www.youtube.com/watch?v=ZEZnNFxsnS8
https://www.youtube.com/watch?v=A2VHQAy1oAo
https://www.youtube.com/watch?v=jcMRfogqRpE

CONTROL OF ERROR:

1. The pattern constructed compared to the pattern shown on the box.

2. The blocks fitting back into the box.

ADDITIONAL INFORMATION:

J saw the trinomial box on the shelf and was very eager to try this on 5 May 2014 (5y2m). Before I could show the presentation, he was too impatient and he had already taken all the blocks out of the box. So he built it, with a bit of help from me. I will like to repeat it again, this time, one layer at a time.

Update 16 Jan 2022:

C worked on this at the preschool. C assisted me with demonstrating this work to the kids at the Chinese class on 12 January 2022.

REFERENCES:

http://www.montessorialbum.com/montessori/index.php?title=Trinomial_Cube

http://www.infomontessori.com/sensorial/visual-sense-trinomial-cube.htm


This is the solution showing 27 factors

28 October 2021: Show Me Day at the preschool


C assisted me with demonstrating this work to the kids at the Chinese class on 12 January 2022.


Sunday, 23 August 2020

Print

C Summary (4Y3M23D): Montessori Sandpaper Letter

  
I felt like I haven't seen daylight for half a year. I started a new job. I really enjoyed my work, but didn't have the self-discipline to keep a balance, as the demands came in. Plus a colleague resigned in May and I was called in to stand in for her until a replacement was found. That intensified work for the last 2.5 months of also during spilling over to some weekends. 

I have neglected the education of my children as a result. I finally quit and served my last day on 7 August. It was a rather emotional time for me. It was the first time in my life I have resigned without another job. And I have left my 15 years with the UN so abruptly.

It was at the same time liberating. I am no longer squeezed between a rock and a stone - thinking of the work I left unfinished when I was with my children and carrying the guilt of not spending time when them when I was working.

And God was gracious. He comforted me from my grief of losing my job with my children. I slowly started doing school time with Baby FECS. Actually, I didn't start. I was still recovering from the over-work from the last six months and the loss of my job. But Baby FECS led me to school time. She has been choosing books on phonics and asking me to read to her. She also plays a part unknowingly on my healing and recovery to get on my feet again, after the very intense period of the last six months.

Today, she chose the letter g. I started bringing in the sandpaper letter today too. We traced the letter 'g' today.

23 August 2020 (4Y3M7D): Here she picked the wrong letter, 'f' instead of 'g' :-)


She really traced with her fingers, until the past, where she wasn't interested. She also repeated after me very willingly the words that start with the letter 'g'.

I thank God for such moments of joy and comfort with our kids.

Friday, 1 May 2020

Print

Montessori Maths Activity: Numbers & Counters


AGE: From 4 years old (after The Spindle Box has been introduced)

OBJECTIVE(S):

1. To reinforce the knowledge that each number is made up of separate quantities.

2. To reinforce the sequence 1 – 10 and how many separate units go to form each number.

3. To introduce the concept of odd and even numbers.

4. To provide indirect preparation for divisibility of numbers.

MATERIALS:

1. 10 numeral cards (1 – 10)

2. 55 counters of the same color.

3. A straight edge.

PRESENTATION:

Day 1: Cards

1. Name the Numbers and Counters and show where they are kept.

2. Ask the child to lay out a floor mat.

3. Lay out the number cards randomly on the mat and have the child say the numbers out loud.

4. Arrange the number cards in numerical order by saying: “Give me Card 1” and have the child put the Card 1 down. Repeat for the other cards until all the cards are laid out in numerical order.

5. Point to Card 1 and ask: “How many counters should you place under this card?”

6. The child should answer 1 and give you a counter.

7. Put the counter below Card 1 and ask the child to count the counter. Ask: “What comes next?”

8. Repeat for the other numbers placing even numbers in pairs and placing the odd numbers with the last counter under and to the middle of the pair until the child understands. (See diagram above)

9. Explain the concept of odd and even numbers: even numbers are those you can find a friend for each of them two-by-two; odd numbers are those with one left alone and has no friend :-(

Day 2: Odd and Even

1. The child constructs the Numbers and Counters from Day 1’s presentation.

2. Run the tip of your index finger down the middle of each column of pairs; for each row in which your finger strikes an unpaired counter at the end of the column, move the card a little above where it was.

3. Tell the child that the numbers which does not have a friend (i.e. an unpaired counter) are “odd” numbers, because you cannot divide it when you draw your finger down (你不能分割ge3), by saying: “This one does not have a friend, so it is an odd number.”

 
1. Repeat for counters 2 and after you have run your finger through the two counters, tell the child that the numbers with a friend standing two-by-two (i.e. pairs of counters) are “even” numbers, because you can divide it by saying: “This one has a friend, so it is an even number.”

2. Have the child repeat for the remaining counters.

3. Do a Three Period Lesson for odd and even.

4. Once the child is finished, look at all of the cards that are slightly higher than the others (cards 1, 3, 5, 7, 9) and tell the child that these are odd numbers (Stage 1)

5. Point to the other cards (cards 2, 4, 6, 8) and tell the child that these are even numbers (Period 1)

6. Repeatedly ask your child to find one that is odd or even or ask your child whether a particular number is odd or even (Period 2).

7. Point to a number and ask: “What is this?” (Period 3).

VIDEO DEMONSTRATION:
CONTROL OF ERROR:
1. The correct number of counters and numerals are provided.

2. The visual image of the pattern of the counters.

NOTE:

1. Introduce this activity in parallel with the spindle box.


2. On day 1, you put out the pattern until the child get it, and you may stay longer to see if the child need help.


ADDITIONAL INFORMATION:

C tried this again on 1 May 2020 (3Y11M15D). She was able to place the glass stones until 5, however, not exactly in the formation of even and odd numbers. J (3Y7M10D) tried this on 15.10.2012 and 17.10.2012.


REFERENCES:

Tuesday, 26 November 2019

Print

Montessori Language Activity: Tracing Chinese Character with Danish Christmas Cookies Pepper Nut "Pedernødder"


Age: From 3.5 years old

Objectives:

1. To provide a fun way to teach writing Chinese characters
2. To train the child's fine motor skills

Materials:

1. 1 stamp and stamp pad
2. 1 Chinese Character
3. 1 toy horse (optional)
4. 1 tray

Directions:

1. Demonstrate to your child how to trace the Chinese character using stamp, taking care to show her the correct sequence of strokes.
2. As you trace, read the Chinese character clearly to your child.
3. Invite your child to try.
4. As her to say out loud the Chinese character that she is tracing.

Additional Information:

Christmas is soon round the corner. I am using the Danish Christmas cookies Pepper Nut "pedernødder" to teach Chinese. The purpose of this activity is not to teach writing Chinese character per se, but to cultivate a love for learning Chinese and the love for writing Chinese characters. I learned this from J's Danish piano teacher. She uses cookies to teach musical notes :-) Thus, this activity incorporates the theory of Montessori with Danish fun way of learning :-)

It may seem to be a lot of cookies to eat at one go, but I made the cookies myself. Thus, it is both nutritious and a healthier version. It is Danish Christmas cookies made with a twist. I use white whole wheat flour to increase the nutrients and dietary fiber. And I also use olive oil, instead of butter. I didn't use sugar, but it is naturally sweetened with dates. Here is the recipe:

https://www.familyfecs.com/2019/11/nutritious-whole-wheat-danish-spice.html

Chinese Translation:

圣诞节快要到了。用丹麦圣诞饼干教小朋友学写字。目的其实不是在于教写字,而是在于用好玩的方式教小朋友热爱学习写字。这方法是我从Our Little FECS 的丹麦钢琴老师那学来的。:-) P.S. 希望小朋友的人生也和饼干糖果一样的甜美 :-)

Saturday, 23 November 2019

Print

Montessori Activity: Tracing Chinese Character with Feathers


Age: From 3.5 years old

Objectives:

1. To provide a fun way to teach writing Chinese characters
2. To train the child's fine motor skills

Materials:

1. 1 bowl contains feathers
2. 1 Chinese Character chicken
3. 1 glue stick
4. 1 toy chicken (optional)
5. 1 tray

Directions:

1. Demonstrate to your child how to trace the Chinese character using the glue, taking care to show her the correct sequence of strokes.
2. As you trace, read the Chinese character clearly to your child.
3. Let her try to paste the feathers onto the Chinese character.
4. As her to say out loud the Chinese character that she is tracing.

Additional Information:

I tried this activity with C today 23 November 2019 (3Y6M7D). She enjoys pasting the feathers. It is hard to recognize the Chinese character, when it is full of feathers, but it is for the fun for it and the purpose is to cultivate love for learning Chinese.


Tuesday, 19 November 2019

Print

Montessori Activity: Tracing Chinese Character with Stamps


Age: From 3.5 years old

Objectives:

1. To provide a fun way to teach writing Chinese characters
2. To train the child's fine motor skills

Materials:

1. 1 stamp and stamp pad
2. 1 Chinese Character
3. 1 toy horse (optional)
4. 1 tray

Directions:

1. Demonstrate to your child how to trace the Chinese character using stamp, taking care to show her the correct sequence of strokes.
2. As you trace, read the Chinese character clearly to your child.
3. Invite your child to try.
4. As her to say out loud the Chinese character that she is tracing.

Additional Information:

I tried this activity with C today 19 November 2019 (3Y6M3D). I use this activity to revise the Chinese character "horse" that she learned during the Chinese enrichment class last Sunday. She preferred other tracing activities better, especially the one with gel crayon. She wasn't so fond of tracing out Chinese character by stamping. She had fun stamping all over the paper instead, which was also fine :-)


19 November 2019 (3Y6M3D)
Related Posts Plugin for WordPress, Blogger...

My Favourite Books

Montessori Materials